Thursday, May 22, 2014

Parts factory

Building feels slow lately although i have done a good job of keeping busy making parts and pieces. Ive got a few bulkheads tacked in place and ill run fillets and tape in the next few days to lock everything in place. At least im starting to get a visual of how things are gonna look and ive been able to pull a few measurements too to help fabricate parts.

#2 bulkead in the bag with rowers footwell side walls and rowers footwell bulkhead support. My original plan was for one sidewall to go to the floor full height and leave the second half size for access under the floor. However my architect buddy pointed out a few flaws in the design...notable that the rowers footwell has no support, and that with that design it would be really hard to get into the "back" of the cavity. So he suggested moving the support to the center to cut the span in half and have two small places under the floor, one in each side hatch. Seems to work really good. Thanks gleason!


Rowers footwell floor in the bag. Nice hefty layup. 3 layers of 8 oz underneath...used scrap since it wont be seen. Lots of 45 degree bias and one layer at 90
On top a layer of 12oz biax over 8 oz cloth, with two more layers of 8 oz on top. It made a super bomber floor. No flexing here.

Tacking bulkheads in place. Spreading hatches to have an interior width of 24"
I found out may table  wasent quite flate when i laid up the first two bulkheads, so there cured slightly cupped. I clamped tham between 2x4s to straighten them out withey got tacked into place.


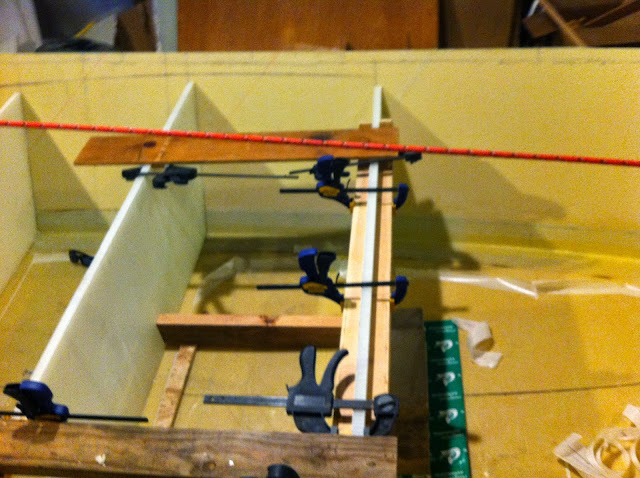
My 24" bulkhead speader allows me to easily mark the sidewalls with the bulkheads vertical. Also allow me to clmap things in place


Clamping foam core in place for gutters. Water drains OUT of the boat, not into the footwell. This is one of those things i never understood about the originally designed briggs gutter systems. They move the water down the gutter and into the footwell, then out of the footwell and out of the boat. These gutters drain to a point about 2" below deck height.

These shorter ones are the gutters for the dryboxes. They drain the sides of the hatch lids into the side box gutters about halfway down.


Gluing them all up at once. Sandwiched between saran wrap covered 1x stock


Dryfit of footwell supports floor etc. correct floor height is very important. Gotta have some place to keep the beer. Sloping slightly forward to drain water to the boatmens footwell drain.


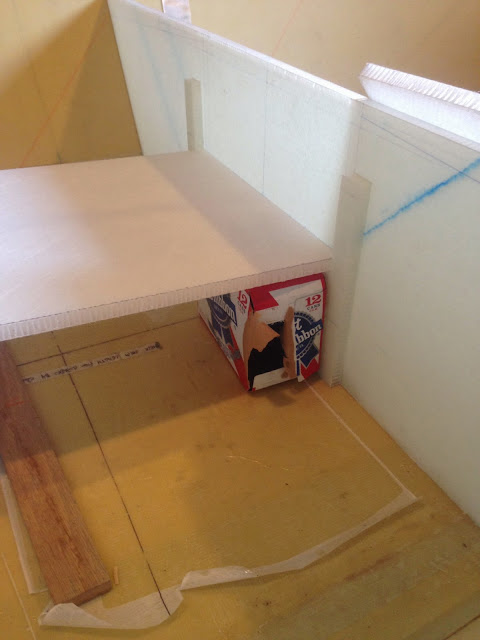
Speaking of beer, can i just say that my new job at the brewpub is awesome!


Glassing the sidebox gutters. This didnt work out the way i planned. No matter how hard i tried with so many pleats it was really hard to get the glass to wrap those hard edges without bridging.  I put a visqueen covered piece of 3/4" mdf inside the bag to give a flat surface to clamp down onto. I dont have a table to bag onto and this was an easy fix to the problem. Work good. Ill use this method more for fabricating little parts.


Gutters kind looked like crap with folded and bridged glass. I attacked them with a grinder. Gotta look worse before it can look better. These are salvagable tho. Ill fair em flat. They will get glassed to another plascore side that supports the deck. Then the whole bottom and both sides will get wrapped in glass tape, and the gutter will get a fillet in the corners and more glass tape in the gutter bottom. The only surface that came out good were the tops where the hatch lid lays...which is the most important anyways. This glass does provide a good bit of structure to the foam. For the side gutters i may try to make a top "mold"  that will suck down onto the gutter top in the bag with saran wrap sandwiched between instead of bleeder ply. This should hopefully keep the glass where in needs to be.


And we caught a few late night surf sessions at the counter to keep things real and remember why i started this whole crazy project in the first place.


Friday, May 16, 2014

Inside seams

Johnny came over the other night and helped me lay inside seams. I could have sworn i had extra 12 oz biax tape layin around but i couldent find it.  Of course 2 days after doing the layup i found it in the scrap box. I laid the chines with 5 oz kevlar tape on the chines with 17 oz biax on top. Stem got kevlar tape at the bottom, 6 oz glass tape, and the transom just got glass tape. After finding the 12 oz biax tape i cut two pieces to tape over the stem and a tall and short piece for transom corners. That left me about 10 ft of tape per side. I cut 2 ft off to tape the bottom outside corners of the boatmans footwell leaving me  8 ft for the impact area of the chine inside.

Of course in the one day the biax tape was missing i tacked in 2 of the bulkheads to thr boat so laying the extra tape in the impact area last night i had to tape around the two center bulkheads. Looks pretty good tho, ready to tack the other two in the center in and start the gutters. Ill keep the part factory going in the meantime. Last night got another bulkhead laid up as well as the rowers footwell walls and vertical support. Couple more bulkheads to go and the vertical pieces of the boat are all fabricated. Killed it this week on pre making parts. Ill try to get a few helpers this week to keep it moving.

Seams looking real pro after the peelply. Really buried the edges. Whack it quick with fairing to bury further and that's it. No sanding!


Couple bulkheads tacked in place. The parts factory is crushing these babies out. 2/3 of them done now! Woohoo. Layups keep getting smaller and easier to do. Feel like I am making progress this week.


Front drybox bulkhead and vertical rowers footwell parts curing in the bag


Saturday, May 10, 2014

Vacuum bagging the hull

One of the reasons the boat build went on hold was due to lack of helpers to pull the hull layup. With weather getting warmer i asked everyone i kew to help spread resin. There was way too much for me to do on my own. Michelle, my roomate steve, and my old roomate billy who is a wood boat nerd came to help glass the hull. It drank a full 3 gallons of resin.
Layup is:
9oz e glass at 45degrees against the foam
5oz poly
17oz biax
5oz poly at 45 degrees
10 oz s glass
17oz biax tape on the chines

This over the side layups which wraps the chines
12oz biax against the foam
5oz poly
9oz e glass

Which is over the the chine tape 
5 oz kevlar tape against the foam
12 oz biax tape

Thats over 100 oz of glass on the outside chines. Hoping this will keep the rocks at bay.


 I pre tack taped the hull and then ran masked newspaper a few inches above. When i was done with the layup i pulled the paper and had a great clean surface for tacking...no epoxy or glass fibers messing up my seal. My pleats came out good. Getting the hang of it after all these layups. Pump pulled about 21" of mercury...my best bag yet. Thanks to all my helpers. Couldent have done it without you.


My favorite boat building helper


The next day i got right to it. Pulled the peelply to reveal a nice surface. Chine line looks a little rough where the bag squashed att those overlapping layers of glass. I hit the high spots with a longboard, and will fair out the low spots and even the chne tape line so it looks good. Its pretty fat, so ill just make the line look tight rather than trying to fair it all out. Its gonna be the point where paint meets graphite epoxy so it doesnt need to flatten that much. In my exhuberance i never took any pics of the finished surface. That night i got my buddy johnny to come over and we rigged a 3:1 off the cieling and some bow and stern loops and promptly flipped the boat back over. It was surpisingly easy but thats because the hull only weighs about 100 lbs right now. Its stupid light. I know its gonna. Get heavier with decks, but i am really amazed at how easy it is to pick the boat up and move it


This panoramic kinda skewed the perspective, buts hard to get the whole boat in the frame otherwise


Prior to all this i got a jump on the interior by glassing some full size bulkheads 80" wide and 24" tall. This is way bigger than any bulkhead i need, but it allows me to just trim to shape and slot in the boat. It will make the center of the interior come together quickly.


Once the boat was flipped i needed to establish the deck line. I took my jig and marked 1 1/4" down the the sheer to mark the bottom of the gunwale line. I then found the lowest point on the sheer at about 9' on the sheer line.  I marked 1 1/2" down from the bottom of gunwale line in that lowest spot the get my deck height. This will give me a bit of space between the decks and gunwale for running anchor rope, and provide space for 1 1/2" pvc tubes for rod holders later in the future. Even though this boat is almost a high side (26" at the locks) with all the flair, the gunwale line isnt much higher than my current boat, and it seems i wont have cavernois hatches. My rowers bulkead will have an 18" tall hatch. Just big enough to squeeze a engel 80 cooler in the hatch with 1/2" height to spare. Only yeti that would fit was a 65 and thats small. Hoping to buy the cooler soon so i can double check the height and clearance. To establish the deck line i made a super ghetto rigged lazer level. $1 from the dollar store. Unfortunatly the camera tripod i intended on using was too tall even in the lowest setting, so i stacked a carboard box with a plywood top and stacked cardboard, wood, and bricks till i had the lazer pointing at my low point deck mark. I aligned the lazer on the center line of the boat length and width wise and pointed heights onto the side panel making sure the level was one. The points didnt come out prefect, but i was able to get my eye on it and sight the flat fair curve. I used a stick to connect the points disregarding clinkers and then faired out the line so it looked good to the eye. I then marked the sheer line every 3 inche. i took the 90 degree corner of a carboard box and measured prependiculaur to the sheer line marking the carboard on the deck line. I then took the cardboard to the other side of the boat and used my marks to scribe the heights every 3 inches and connected the lines. Looks good. I reused my chipboard bulkheads to make a 24 spreader for the bulkheads that will ensure the bulkheads are vertical and that i have a 24" spread in my hatches. It also allow me to easily visualize the 3/4 height of the plascore on the decks.  Makes finding heights easy. Ill use this to set all the bulkheads, cutting the bulkheads as i get further twords the skinny ends.

$1 lazer level


Here's some random shots of the hull and curved stem and transom


The curved line you see is actually the flat line  of a traditional stem cut. You can see where the 1 1/4" deep arc adds volume to the bow, kick rocker right at the tip, and a slightly taller stem. All good things in my opinion


Cutting Kevlar tape for inside seams. Those will get done on Monday when a new shipment of epoxy arrives . 12 gallons Sofar


Boating season has started! Gros ventre is running. Time to kayak!